Edsby is a modern web application that uses modern web standards like HTML5 and JavaScript to deliver a powerful and elegant user experience using the web. For this to work properly you need to have a reasonably modern web browser that is designed to support these popular web standards. Browser upgrades are free, and each new version tends to be faster and better than its predecessor, so it is a good idea to keep your browser up to date.
Edsby is tested extensively on recent versions of:
Google Chrome
Apple Safari
Mozilla Firefox
Microsoft Edge
We know that it is not always possible to run the very latest version of a browser, so we try to make sure Edsby will work with older, less capable browsers. However, we do not guarantee Edsby will work on anything older than two major versions back.
Cookies Required
Like many modern web applications, Edsby stores a local “cookie” on your computer to help speed things up. You need to make sure you have cookies enabled in your browser for Edsby to work properly. Consult the help documentation for your browser if you need to find out how to check this browser setting.
JavaScript Required
The Edsby web user experience is built with JavaScript. You need to make sure you have JavaScript enabled in your browser. Consult the help documentation for your browser if you need to find out how to check this browser setting.
If you have an account on an Edsby system, log in at the Edsby URL provided by your school or district. You might find it on your school or district’s website, or may have to ask your school for it. It will resemble https://your-server.edsby.com, where “your-server” is a name unique to your system.
You do not log in on the Edsby website.
Whether you’re a student, staff member, or parent, you can use Edsby on your browser and the Edsby mobile app. Follow the instructions below to access your account. If you any questions about which login methods to use or run into difficulties, contact your school for assistance.
Students & Staff
Log in on your browser
Follow the Edsby URL provided by your school or district (for example: your-server.edsby.com).
Tip: For easy access, bookmark this page in your browser.
Log in with your Edsby credentials
Enter the username assigned to you by your school or district.
Enter your password.
If it’s your first time accessing your account, you will need to create a password before proceeding.
Authenticate with Google or Office 365
Some schools and districts choose to have users log in to Edsby with their Google or Microsoft accounts. If your Edsby system offers it, select the Google, or Office365 login option. Select an alternative login option (Google, Office365, etc.). You will be redirected to their login page.
Enter your credentials.
Log in with the mobile app
Download the Edsby mobile app.
Tap “Get Started” and enter your school or district’s server address. This is the first part of your Edsby URL (for example: your-server.edsby.com).
Log in with your Edsby credentials
Enter the username assigned to you by your school or district.
Enter your password.
If it’s your first time accessing your account, you will need to create a password before proceeding.
Authenticate with Google or Office 365
If your schools or district requires you to log in to Edsby with your Google or Microsoft account, select the Google, or Office365 login option. You will be redirected to their login page.
Enter your credentials.
Check “Remember Me” to keep your login information saved.
Remember, never save your login information on shared devices.
Parents & Guardians
Activate your account
Open the email with your invitation to Edsby.
Click the “Activate or Connect your Edsby Account” button. This will bring you to the registration form.
Create a new account by clicking “Activate my account”.
Click the “Activate or Connect your Edsby Account” button. This will bring you to the registration form.
Click “Connect to an existing account”.
Fill in your information.
Click “Connect to my account”.
Log in on your browser
Follow the Edsby URL provided by your school or district (for example: your-server.edsby.com).
Enter the username assigned to you by your school or district.
Enter your password.
Log in with the mobile app
Download the Edsby mobile app.
Tap “Get Started” and enter your school or district’s server address. This is the first part of your Edsby URL (for example: your-server.edsby.com).
Enter the username assigned to you by your school or district.
Enter your password.
What do you need to log in?
The Edsby URL provided by your school or district. Find it on your school or district’s website, or ask your school directly. It will resemble https://your-server.edsby.com, where “your-server” is a name unique to your school or district. The server address will be requested by the Edsby app when you first log in.
A username. Your school or district will assign you a username. This is a unique identifier that could be a staff or student number, an email address, your name, or something else. Every school or district sets up usernames differently, so make sure to ask your school if you don’t know yours.
A password. Ask your school if you’ve already been assigned a password. If you haven’t you will be prompted to create a password the first time you log in.
Access to your Edsby system is controlled by your school or district. If you forgot your login credentials or have been locked out of your account for using an incorrect password, contact your school. Some aggressive access control systems disable accounts after a number of unsuccessful tries. Even if you remember what your correct credentials are, you might still be denied access to Edsby and your other computer systems until your account is reset by a tech resource at your school.
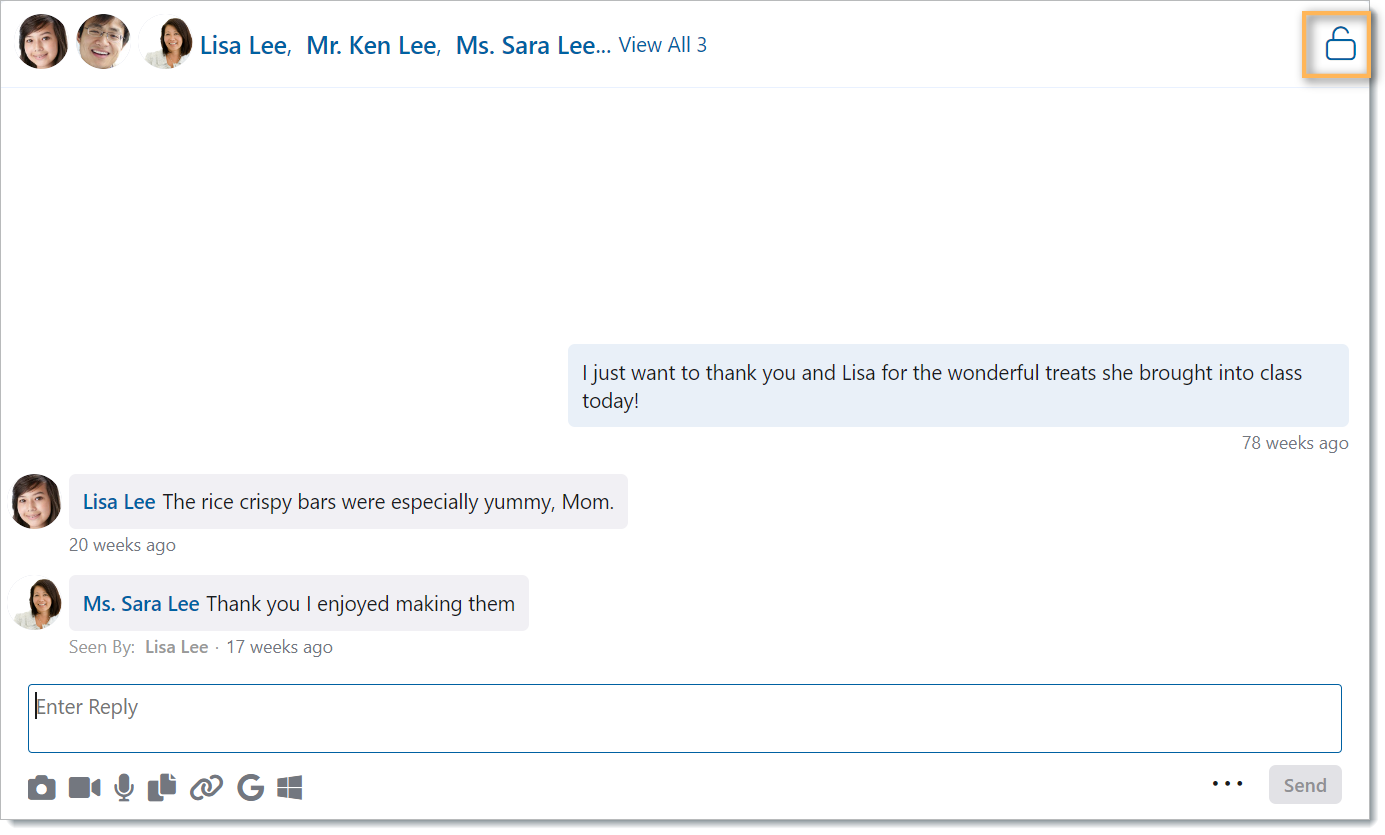
Edsby enables teachers to send private messages to parents, students, and other staff members.
Messages can normally only be read by the recipients and the sender. But be aware: administrators can see Edsby inboxes. Messages in Edsby are never deleted because of the student safety and compliance policies unique to K-12. Edsby messages, sent or received, cannot be archived or deleted by end users.
Teachers are able to un-send Edsby messages they send, but students and parents cannot.
Click the mail icon in the navigation bar to access the inbox and view all past messages.
New messages are created by clicking the compose icon in the inbox. Search for the name of the recipient(s) to message.
Teachers can add any number of recipients when creating a conversation, however, this cannot be changed afterwards. Think of Edsby Messages as a chat room rather than a chain of emails.
To help teachers keep a specific conversation focused on its original intent, teachers can close a conversation by clicking the lock icon.
Senders of private messages in Edsby see in their mailboxes when recipients have opened and read their private messages. This means a teacher can see when individual parents, for example, read the private or group messages they send. It also means parents, in turn, can also see when teachers read their messages. This is intended to promote transparency in communications.
Teachers should avoid creating private messages to all students in a class. It’s more work. Teachers should just post a note in the relevant Edsby class instead. It’s quick and easy, and students will see it because they get notifications of new notes in their classes and have learned the Edsby class is where important information is posted.
Note most schools and districts intentionally disable Edsby messaging between students. When they do, students cannot send messages, or chats, to their friends in Edsby. usually because their school or district is concerned about what students might exchange. Most Edsby customers encourage student-to-student messages in other official systems if they allow it at all.
Some Edsby sites even disable Edsby messaging between parents and teachers. When they do, it is often to encourage parents to use other official channels for teacher communication or because they don’t want to add to teacher workload.
If messaging between parents and teachers is enabled, Edsby enables teachers to choose whether or not parents can send them unsolicited messages. Navigate to Settings and click Other Settings. Select the box to enable unsolicited messages and deselect the box to disable them. This can be changed at any time.
Calendars are a core aspect of Edsby. Edsby maintains many separate calendars within each user’s account: calendars for groups, classes, school news, etc.
Users can synchronize the contents of any of their Edsby calendars with popular calendar software, including Outlook’s calendar, Google Calendar, or virtually any other calendar program that can pull information from external calendars using the iCal, or iCalendar, protocol supported by Edsby for calendar export.
And if a mobile device is synchronized to one of these calendar programs, Edsby events will appear on mobile, too.
Here’s how to set up calendar syncing from Edsby:
1. On a desktop computer with a web browser, navigate to the specific Edsby class, group or other calendar you want to synchronize. Once you’ve found the calendar you want, in the calendar pane at the the top right of the screen, click the “Open full page calendar” button.
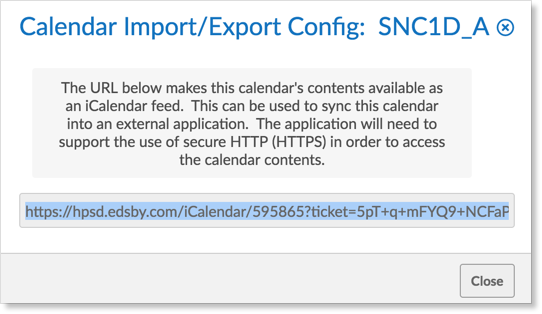
2. In the full page calendar view, click the Sync button
3. Edsby will generate a URL for your selected calendar in a pop-up window. Copy and paste the URL to your computer’s clipboard.
4. In your other calendar program, find its calendar import feature and paste your Edsby calendar URL, such as described below for Google Calendar and Microsoft Outlook. Repeat the process for other calendars you may want from Edsby. Note you cannot change any Edsby calendar information yourself; the synchronization is one-way only.
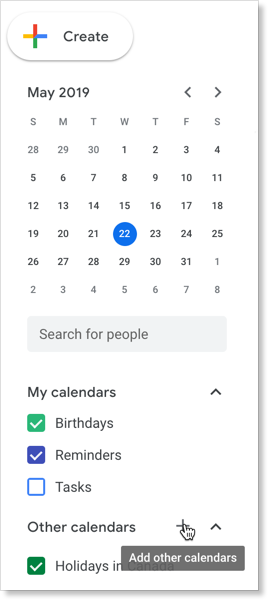
In Google Calendar
Click the + next to ‘Other Calendars’ on the left side of the screen to add another calendar.
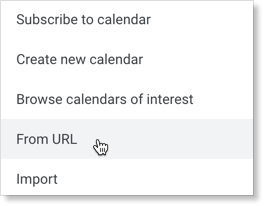
Select “From URL.”
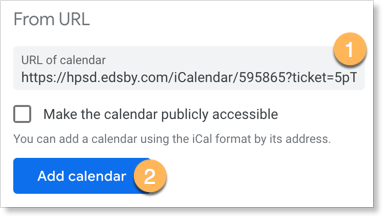
Paste in the Edsby URL and click the “Add calendar” button. The calendar events will be loaded.
Then, from your Google Calendar desktop, hover over the newly-added calendar in the calendar list, choose “Options” > “Settings” and give your new calendar a more useful name than the one it defaults to.
Google Calendar users, note that Google will only update calendar information from external calendars once every 24 hours, randomly. This means any additions or changes to Edsby calendar events could take as long as a whole day to appear in your Google Calendar. This is a limitation of Google Calendar, not of Edsby.
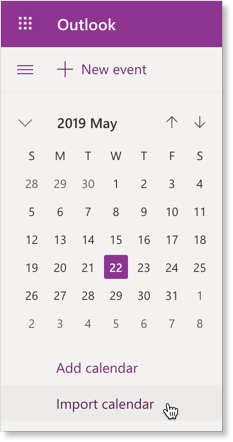
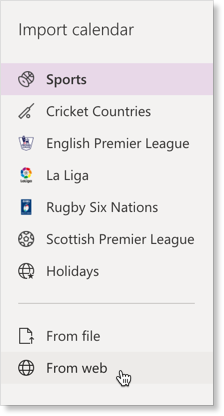
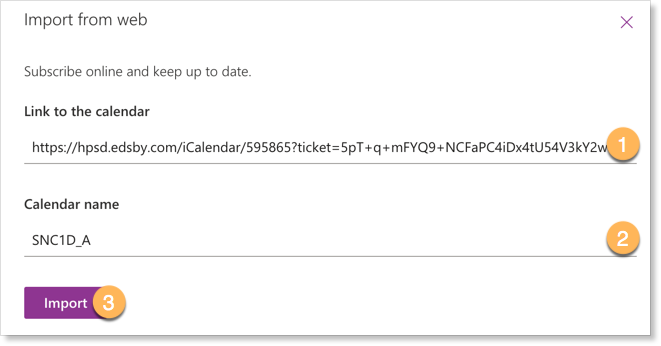
In Outlook
In the Outlook calendar, click ‘Import Calendar’ on the left side of the screen.
Select “From Web.”
Paste in the Edsby URL and name your calendar. The calendar events will be loaded.
Mobile Calendar Sync
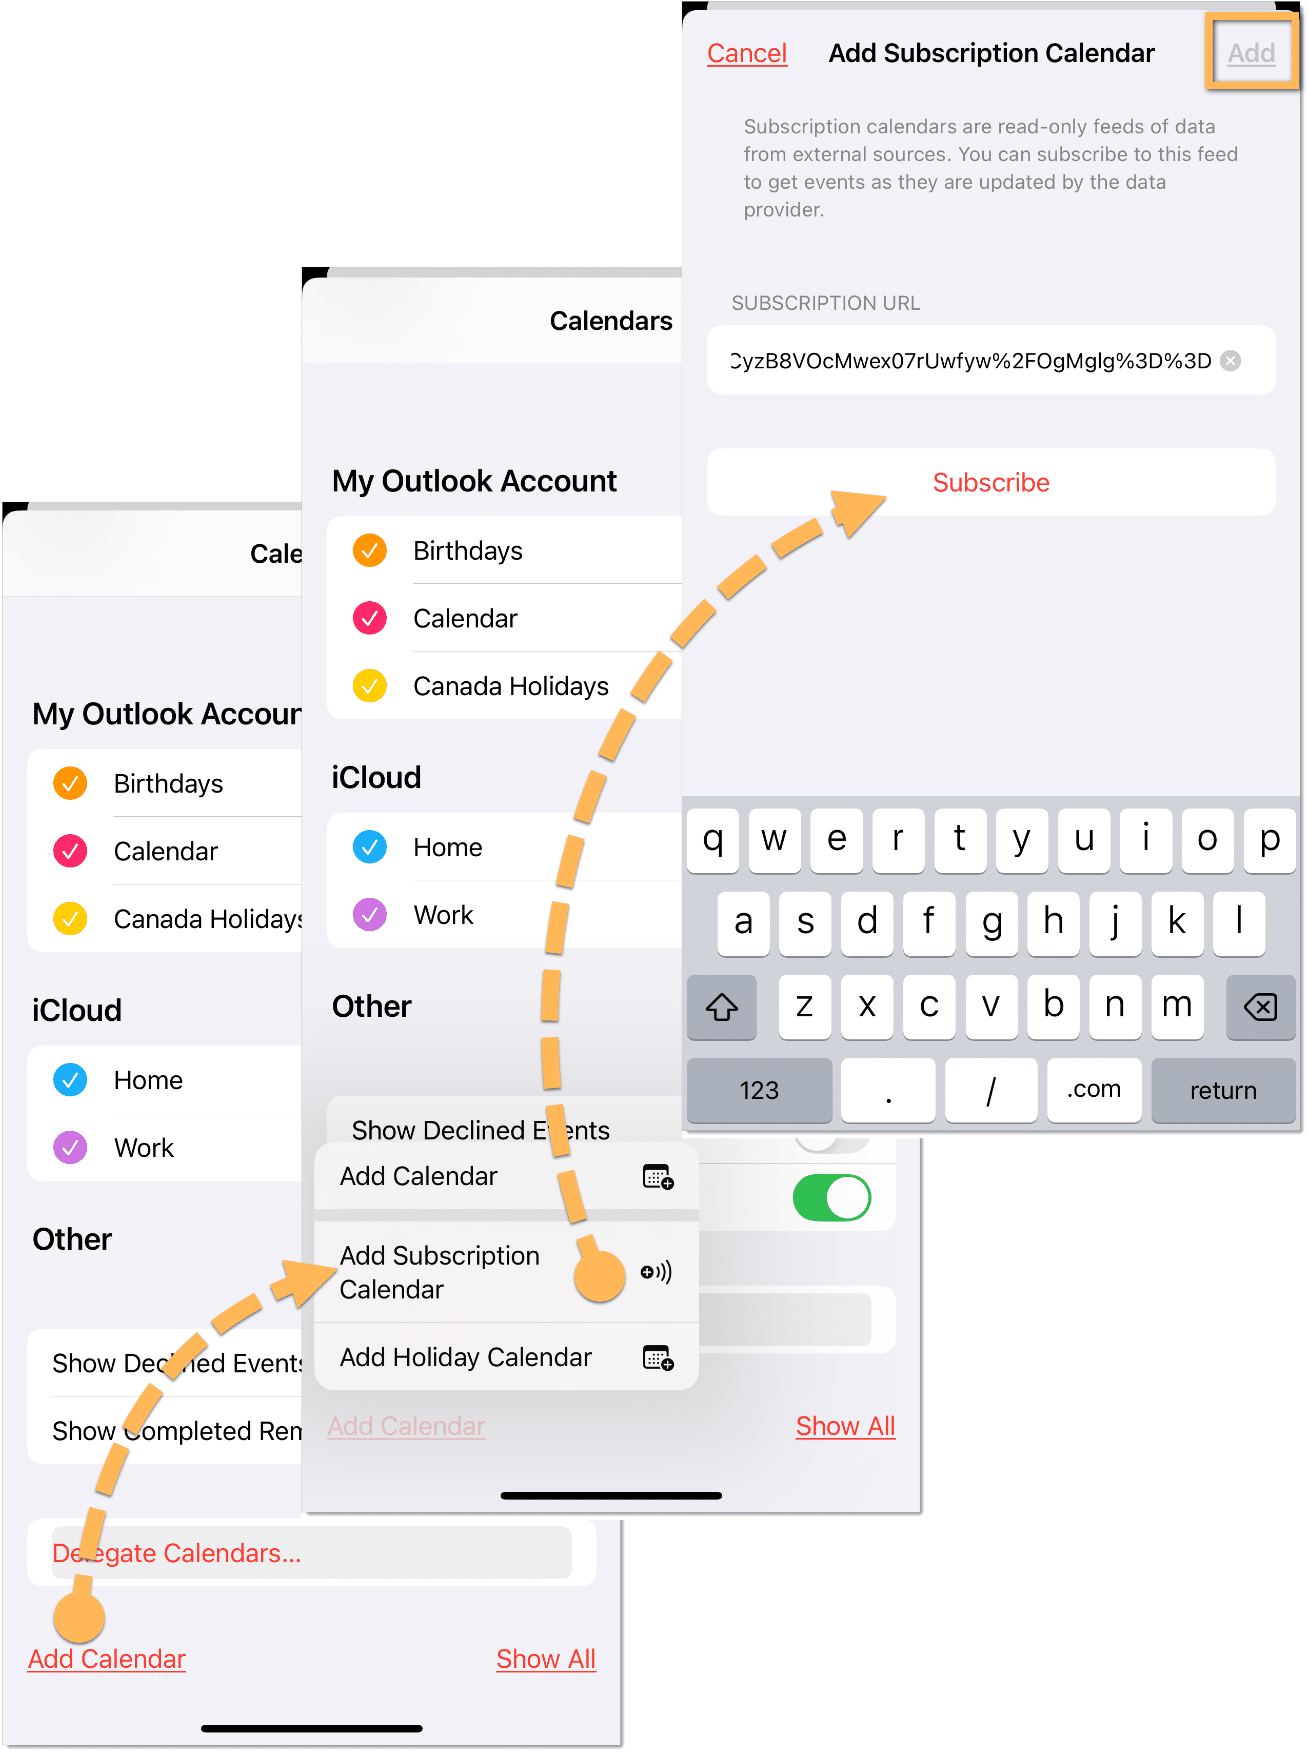
To sync your Edsby Calendar to your mobile calendar, copy the Edsby Calendar URL from your browser and send it to your mobile device. On an IOS device, copying the URL to your clipboard will allow you to paste from your mobile device. For android users, you can email the link to yourself and copy it from your mobile device. Once you have the link copied on your mobile device, navigate to your calendar and and tap Add Calendar. Choose Add Subscription Calendar and paste the URL, tap Add.
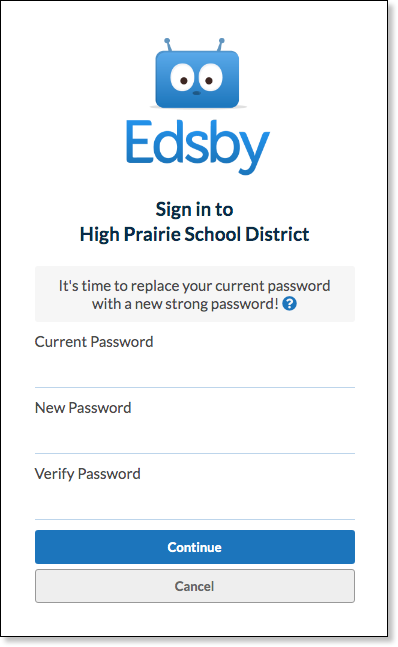
Edsby wants to be sure your account is appropriately protected. When you log in to Edsby your password is evaluated to assess its strength. If it doesn’t meet the strength guidelines configured for your system you will be asked to select a new stronger password.
Creating a new password is easy. First, you need to enter your current password again. Then, you need to enter your new password twice and press “Continue”.
Edsby first checks to make sure your current password is correct and will let you know if it isn’t.
Edsby next checks that the two entries of the new password are the same and will let you know if the two don’t match.
Edsby then assesses the strength of the new password you’ve entered by checking the following, and provides a helpful error message if any of these checks fail:
Must be at least 8 characters in length
Cannot contain more than two repeating characters in a row ( “kitty111” is not allowed)
Cannot contain more than three sequential characters in a row (“kittyabcd” is not allowed)
Cannot match anything in a library of heavily used passwords ( “password” is not allowed)
If your new password passes all these tests then Edsby will replace your old password with the new one and log you in and display your home screen.
Next time you log in use your new password.
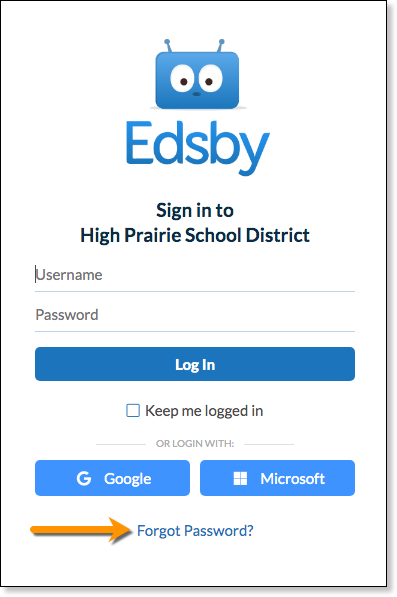
Forgotten Password
You may have saved your password and no longer remember it. In this case, when you are asked to choose a new password, click Cancel to return to the Login screen.
Click the Forgot Password link and we’ll send an email to the address associated with your account. The subject of the email is “Edsby Forgot/Reset Passwords”.
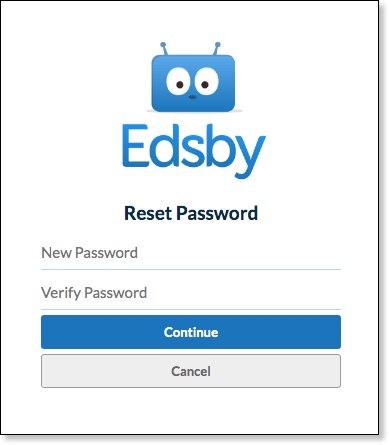
The message includes a link to reset your password. Clicking on the link will take you to this screen.
Enter your new password twice. Edsby checks that the two entries of the new password are the same and will let you know if the two don’t match.
Edsby then assesses the strength of the new password you’ve entered by checking the following, and provides a helpful error message if any of these checks fail:
Must be at least 8 characters in length
Cannot contain more than two repeating characters in a row ( “kitty111” is not allowed)
Cannot contain more than three sequential characters in a row (“kittyabcd” is not allowed)
Cannot match anything in a library of heavily used passwords ( “password” is not allowed)
If your new password passes all these tests then Edsby will replace your old password with the new one and log you in and display your home screen.
Next time you log in use your new password.
If a parent forgets their password, they should click “Forgot password?” on their Edsby login screen and follow the instructions on the screen.
In some cases, a parent may not have access to the email associated with their Edsby account or the Forgot Password button may be unavailable. In this case, teachers, the principal, guidance counselors, and any IT staff can reset parent passwords.
When students want to communicate with a teacher but don’t want to post in the class, they can send a private message. Messages can normally only be read by the recipients and the sender. But be aware: school and district administrators can see Edsby inboxes. Messages in Edsby are never archived or deleted because of the student safety and compliance policies unique to K-12. Nor can students unsend or erase messages.
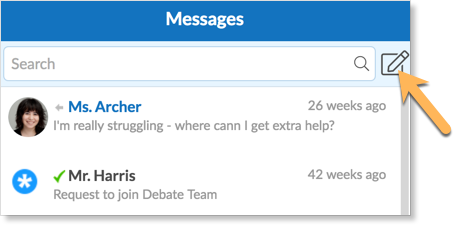
Click the mail icon in the navigation bar to access the inbox and view all past messages.
New messages are created by clicking the compose icon in the inbox.
Students can take pictures through a device’s camera, attach existing pictures or photos, videos, Internet links and other files to messages using the icons at the bottom of the message compose window.
Note: most schools and districts intentionally disable Edsby messaging between students.
Schools and school districts that use Edsby generally choose not to allow students to manage their own profile pictures as a matter of policy. Some import official school pictures as students’ Edsby picture. Some don’t allow any pictures at all and only use a default icon for every student.
If your school or district has imported a picture of you that you’d really like to change, speak to the office at your school and they may be able to help you. However, there is no guarantee.
If you’re a parent at a school or district that uses Edsby, ask the office at your school for an account on their Edsby system.
You can’t just set up an account yourself. Your account needs to be connected to that of your child, or children. So the school must set up the account for you.
In most cases, after the school is satisfied that you’re indeed the parent of your child and are entitled to access your child’s information, they’ll send you a special email with a link unique to you. That special email will allow you to set up your Edsby account in seconds and it will be connected to your children’s information. If you’re having problems receiving this invitation email, contact your school.
In short, if you’re interested in using Edsby as a parent and having difficulty, it’s always best to contact your child’s school for specific instructions.
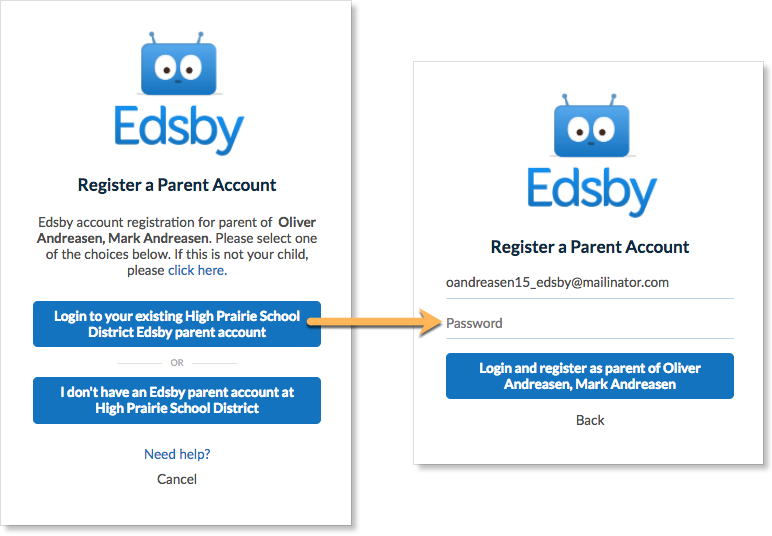
In most cases, parents receive a separate email from the school or district for each student they have in the district. You need each of these emails to link them to a single Edsby parent account. Click the link(s) in the email(s) you were sent and a browser will send you to a screen like the below on the left:
Assuming you’ve already set up an Edsby parent account and are adding an additional student, choose the Login to your existing Edsby parent account button in the screen above. Enter your Edsby username and password. Your existing Edsby account will now include your additional child.
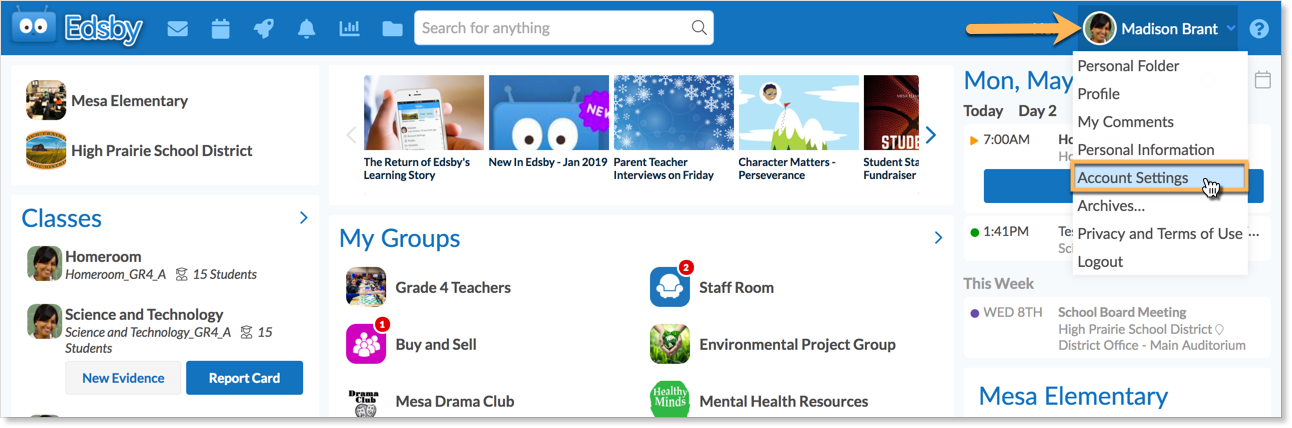
Users’ Edsby password may be reset or a new password chosen from within Edsby settings. To choose a new password on a web browser, navigate to the drop-down menu found next to the name in the top right corner of the account and select Settings. On the mobile app, Settings may be found under the app’s hamburger menu.
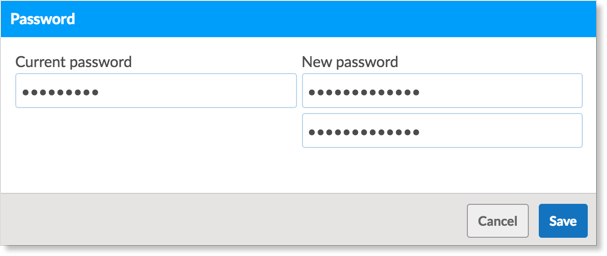
Next to the row labeled Password, click Change. This will open a form to choose a new password.
Type in the current account password and then choose a new password. The password must be at least 8 characters long. Type the new password in again to verify it. Click Save. The account password has now been changed.
The new password will be required the next time the account is logged into.
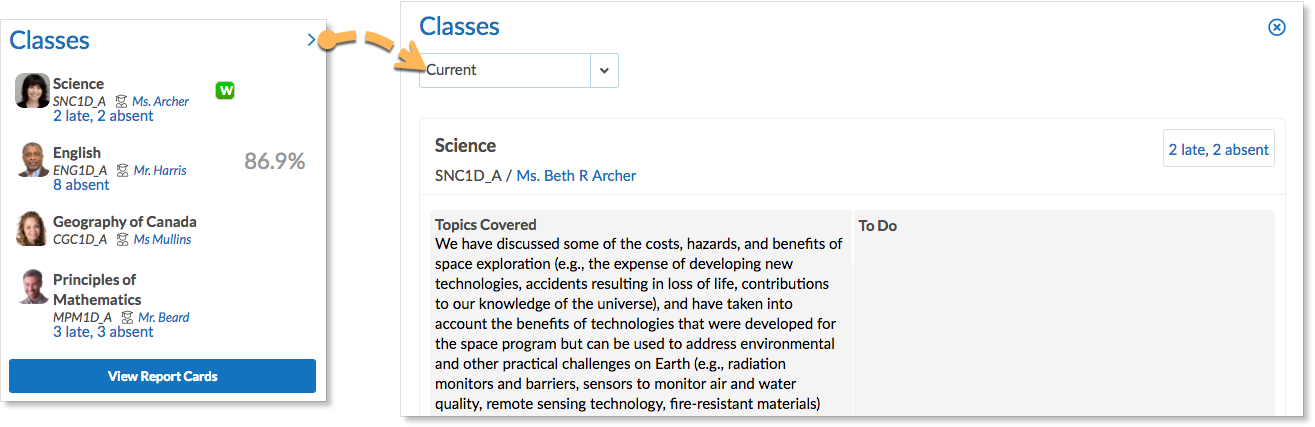
The class journal is one of the most effective tools on Edsby for communicating learning objectives and student expectations. As such, it is important that parents on Edsby are able to keep track of Journal entries and see what their children are learning. For parents to view class Journal entries on Edsby, they simply need to click on the Classes panel on their homepage. They will then get an expanded list of the classes – including the most recent journal entry.
They can then click on “view full journal” to view the entire journal, even if they don’t have permission to enter the class.
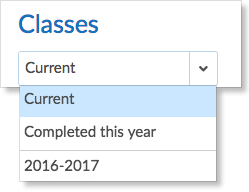
Your Edsby homepage only displays classes currently active. Once a reporting period/semester is over, finished classes are archived and new ones take their place.
If you would like to view grades, assessments and other materials from a completed class, click the word “Classes” in your classes list, or the blue arrow at the top right corner of the Classes Panel.
This will bring up a new box with a drop-down menu, where you can choose classes from previous terms. Select from the dropdown menu when you want to view classes from.
You’ll see this message for generally one of three reasons:
All logins temporarily disabled – Your school district or individual school may have turned off Edsby logins for a time, for instance over the summer break. They usually turn Edsby on again a few days before the start of school after they’ve input all the new school year information, including classes and schedules.
Incorrect password attempts – If you enter a wrong password three times in a row, Edsby temporarily disables login attempts for that username. When this happens, instead of the usual “incorrect username/password” message, you’ll see a warning that your login has been temporarily disabled. If you think this has happened, wait a couple of minutes and try again. Millions of students, parents and teachers use Edsby, so security is a top priority.
Discipline – Your school or school district might have disabled your account for disciplinary reasons. If you suspect this is the case, contact your school for details.
Many school districts allow their teachers to exercise professional judgement when assigning students’ final grades. So, while Edsby may have reported certain grades to you throughout the school year based on your assessments and how teachers have been weighting them (not all of your tests and exams get the same weight, i.e. are worth the same to your final grade), teachers ultimately may be getting a say.
So, if your final grades are different from what you’ve been seeing in Edsby, it’s not a flaw in Edsby. It’s an intentional decision on the part of your school district.
When this happens it can be confusing, but it doesn’t mean something is wrong. Here’s what’s going on:
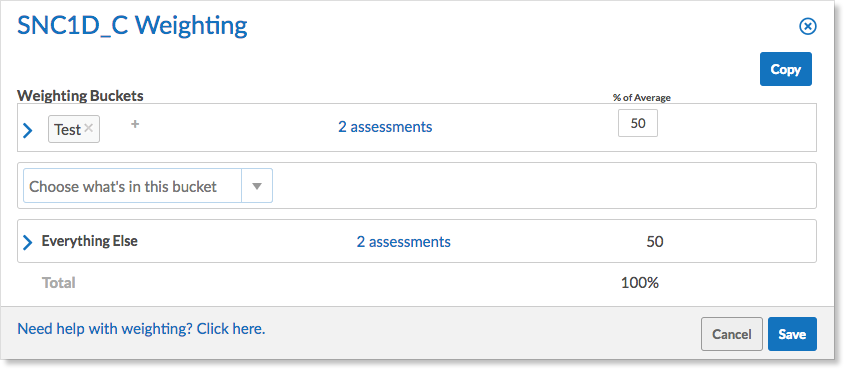
Edsby gives teachers the ability to use weighting to define what percentage of your overall grade each assessment type is worth. For example, a teacher could define that tests are worth 50% of your overall grade, and everything else (homework, final exam, quizzes, labs, etc.) are worth 50%, for a total of 100%. On top of that, each individual assessment can have its own weighting within each “weighting bucket”. Just because you’ve written two tests doesn’t mean each one is worth 25% of your final grade. The teacher could have set one test to be “worth” more than the other.
In an example where tests are worth 50% and everything else is worth 50%, here’s what the teacher’s weighting looks like on their side in Edsby:
Your overall average is calculated by first determining your average for all tests (and remember, not all tests necessarily carry the same weight, so it’s not as simple as adding up the averages and dividing by the number of tests you’ve written). That number is then multiplied by 0.5, as “tests” contribute 50% of your overall average. All of your other assessments are likewise averaged out and multiplied by 0.5. Those two values are then added together to calculate your overall average.
Let’s use some actual numbers here to make this more clear: It’s early in the semester. So far, you’ve had a homework assignment, a quiz and two tests graded and shared in Edsby. Your grades are:
Homework Assignment 1: 70%
Quiz 1: 80%
Test 1: 100%
Test 2: 90%
For the sake of simplicity, we’ll assume all assessments are weighted equally within their respective buckets, meaning each assessment is worth the same as the other assessments in that bucket. In that scenario, your overall average is calculated by averaging the homework assignment and the quiz then multiplying by .5, averaging the two tests and multiplying by .5, and then adding those values together.
Your “Everything Else” average is 75%: (70% + 80%) / 2. This 75% average is worth half of your overall average in the class, or 37.5.
Your Test average is 95%: (100% + 90%) / 2. This 95% average is worth half of your overall average in the class, or 47.5.
Your overall average is 37.5 + 47.5, which is equal to 85%. This value is what you see in Edsby as your current grade for this class. Here it is from the teacher’s perspective:
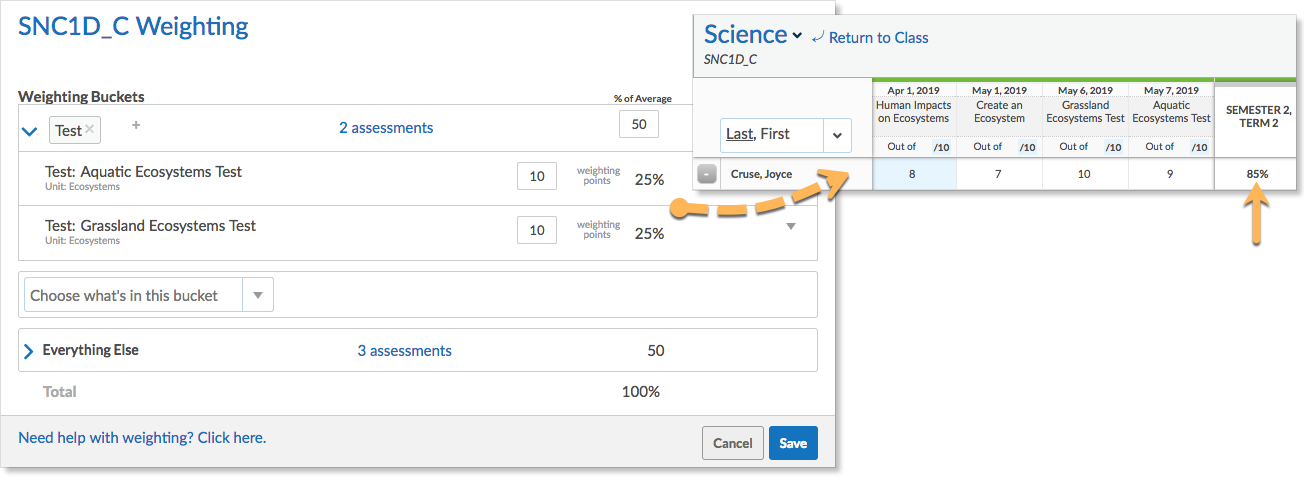
A week passes, and you’ve written a third test. The teacher grades it and shares it, and you’ve done very well – 89%. But wait! Your overall average dropped from 85% to 84%! How is that possible? Let’s go back to the math.
Your “Everything Else” average hasn’t changed. You still have two assessments in that bucket with a 75% average. That bucket is still contributing 37.5 to your overall average in the class.
The “Test” bucket, however, now has a third assessment in it. Your Test average is now 93%: (100% + 90% + 89%) / 3. This 93% average is still worth half of your overall class average, or 46.5.
Your new class average is now 37.5 + 46.5 = 84%. This is now the value you see as your overall average in the class. Here it is from the teacher’s perspective:
As more assessments are added to a weighting bucket, each assessment contributes a smaller amount to the total average of that bucket. So, despite receiving an 89% on your most recent test, your overall average has dropped from 85% to 84%, because that 89% actually lowered your average in the “test” bucket from 95% to 93% and the tests with the higher grade are now contributing less to the average.
Here’s the takeaway: when you receive a grade for an assessment, what matters is how that grade compares to your other assessments in the same weighting bucket. If it raised your average in that bucket, your overall average will go up. If it lowered your average in that bucket, your overall average will go down. By how much? It depends on how significantly your average changed within that bucket and how much that bucket contributes to your overall average.
The Edsby “My Work” link for each class shows the weighting buckets your teacher has set up and your up-to-the-minute average in each, which helps make this more transparent. However, if you’re still unsure why your overall average is what it is, speak with your teacher and ask them to explain how they’ve set up the weighting for your assessments.
Some school districts that observe a quarterly schedule sometimes choose to give students a “blank slate” in Edsby when each quarter begins. This is an academic policy of the district. These districts have configured Edsby to hide students’ previous quarter’s grades when the new quarter begins. It’s not an Edsby bug—it’s how these districts want things in Edsby.
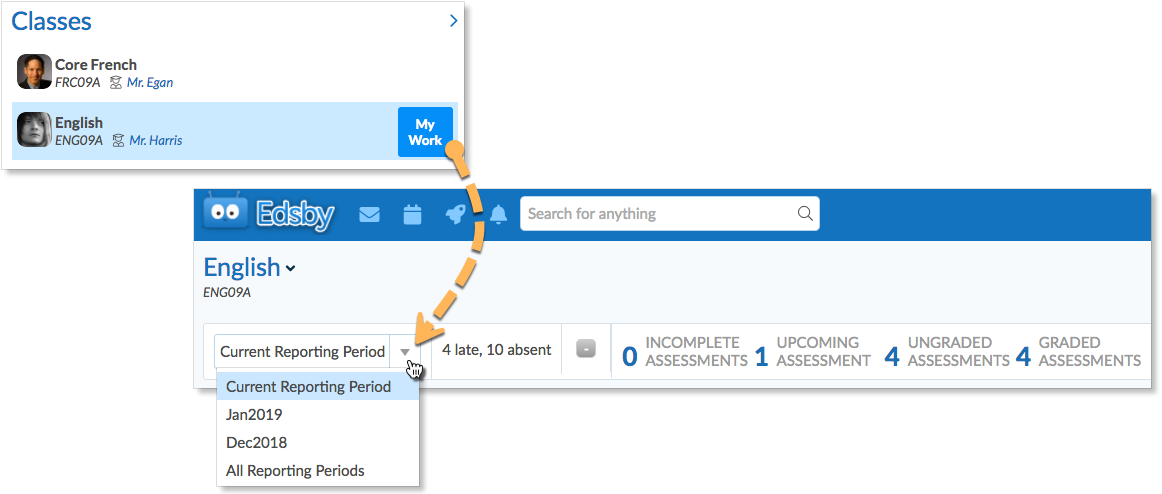
Students and parents CAN still access previous quarter’s grades in Edsby. Use a web browser to log in to your Edsby system. Then:
In Classes on the left side of the screen, mouse over a class. “My Work” will appear.
Click My Work.
In My Work, Current Reporting Period will be selected as the timeframe by default. Click the Current Reporting Period pull down and select a previous reporting period.
Note: students and parents can only view previous reporting periods through a web browser. Previous periods cannot be accessed yet on the Edsby mobile apps.
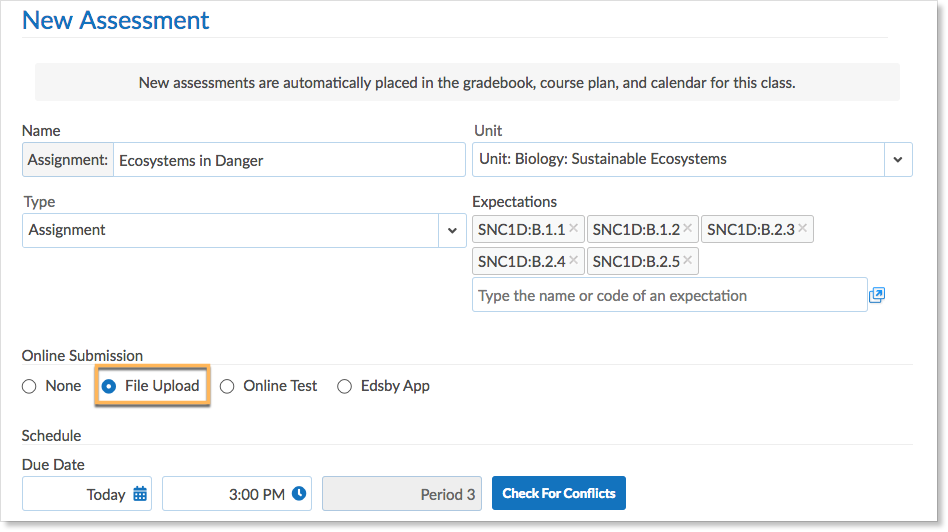
To enable students to submit a file as their work for an assessment, select File Upload on the assessment’s form. You can enable or disable online submissions at any time.
Students will see a submit button on their home screens and My Work.
Students access My Work from the home screen by hovering over the class name. Students also see a link to My Work inside the class. Students will also see a submissions button in the Recent Activity feed across all their classes, and in the feed of the class in which it was assigned.
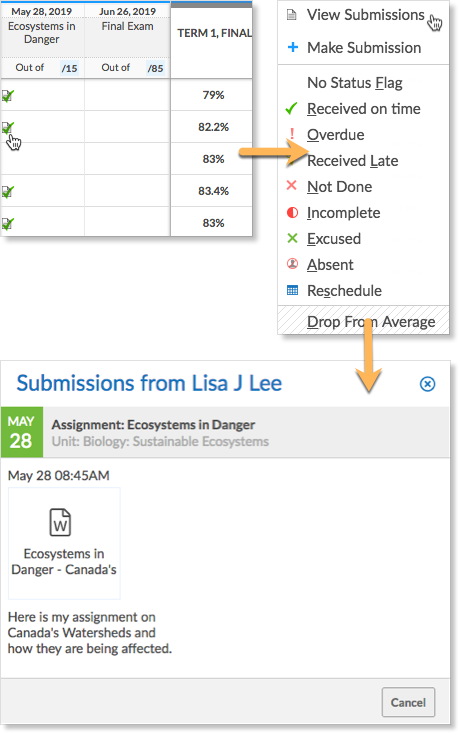
Viewing the submissions
To view the student submissions, click on the file icon to open the Grade Gadget. Click View Submissions to view the file. The exact submission time is listed above the file.
A green checkmark indicates the assessment was submitted before the Due Date’s day and time. A yellow checkmark indicates the assessment was submitted after the Due Date’s day and time. You can change the assessment tag to Received on time if you don’t want the assessment tagged as Received Late.
Teachers Making Submissions
Teachers can also upload their own submissions to an assessment on behalf of a student or to upload a marked version of their assessment.
To make a submission, navigate to the Gradebook and click the assessment state or drop-down arrow within the given student’s cell. Select Make Submission.
Using the upload icons, select the file you wish to upload as a submission. Add a comment. Click Submit.
The file will be submitted. The student can view your submission in their My Work Report.
Note: Making a submission will automatically mark the student as having completed the assessment, even if they have not made their own submission.
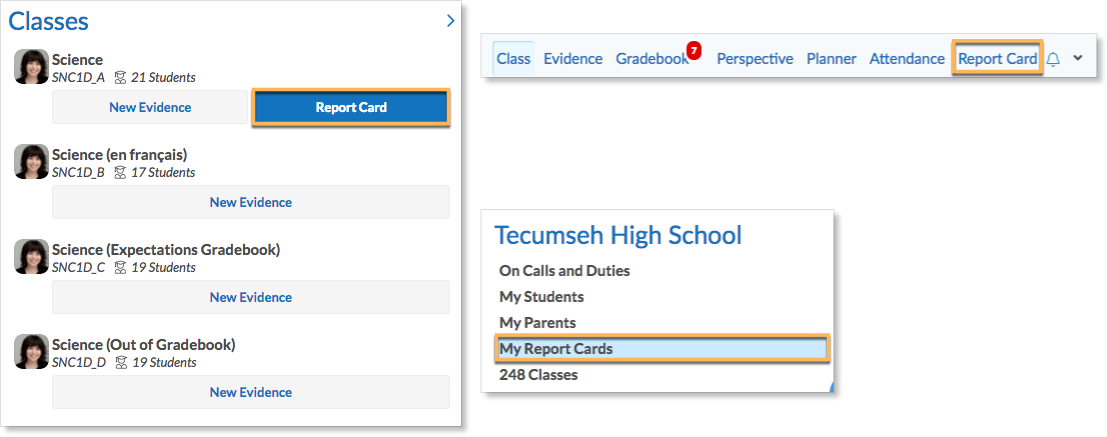
For school districts using Edsby for report cards, report card sheets are generated for teachers every reporting period which are pre-populated with Edsby gradebook and attendance data to make completing them easier.
Usually, these report card forms are made available to teachers near the end of a reporting period at a time chosen by a district administrator. Once the time has come, teachers will see links to the report card forms appear on their Edsby homepages and within the classes.
If you are a teacher and you do not see a link to the report card sheet for a particular class, it is likely that the class was not properly added to the reporting period. If this is the case, you will also notice that there is no average column in the gradebook and that you are unable to set the weights for assessments within this period. Luckily, this problem can be easily fixed by a school administrator or an Edsby customer support representative. Just contact them with the name of the school and the class so that they can locate it and add it to the reporting period.
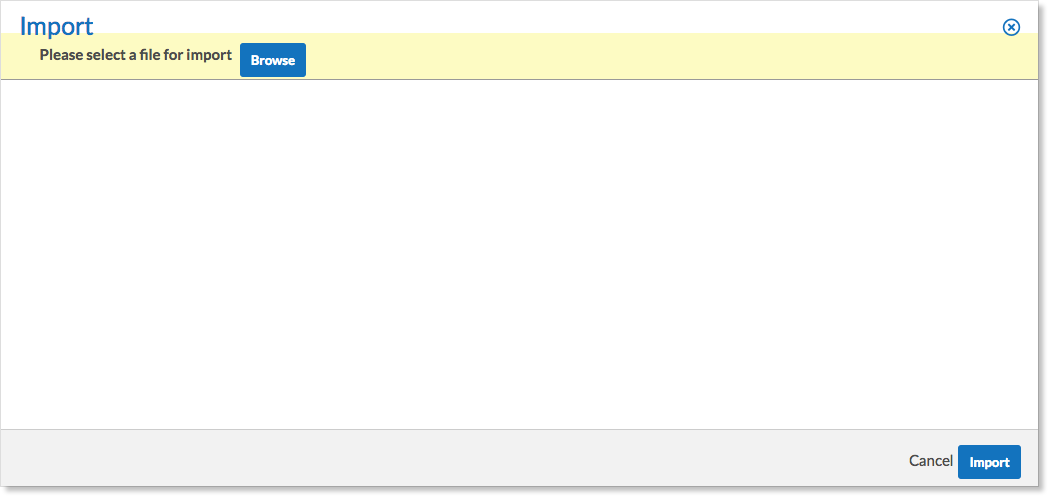
Edsby allows teachers to import CSV files into the gradebook to generate graded or ungraded assessments. To use this feature, just open the gear menu in the gradebook and select “Import.”
This will open the following form:
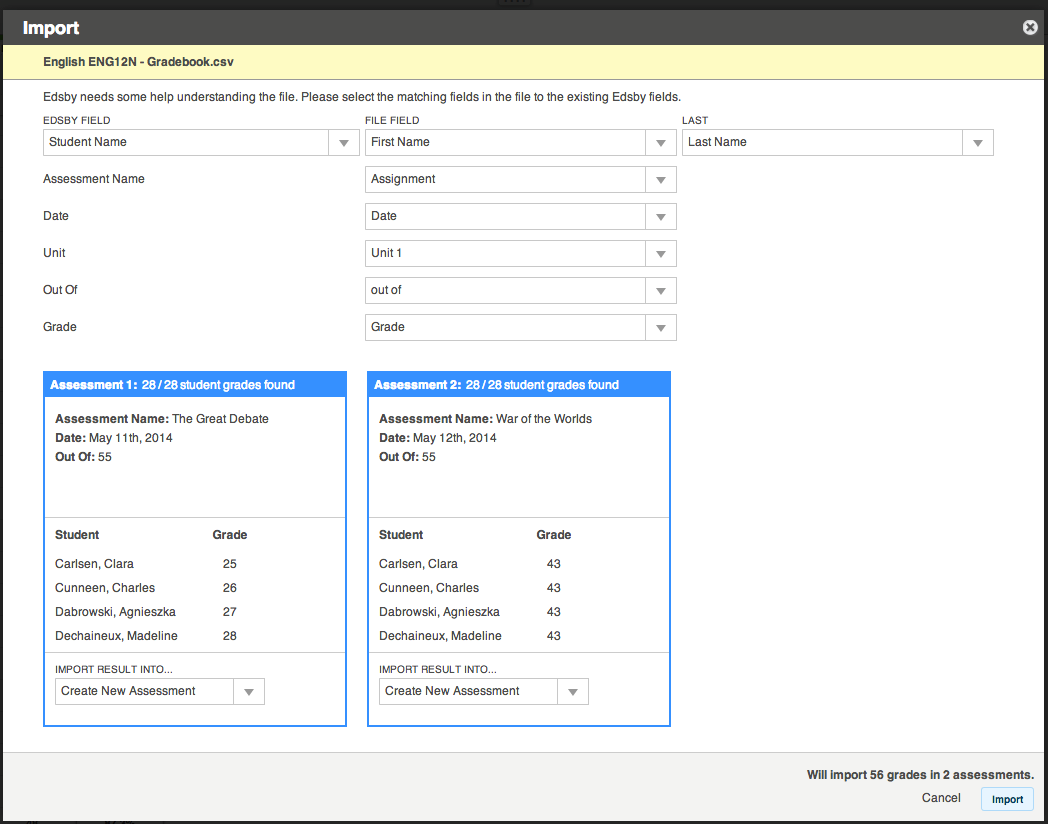
Edsby needs to know which values are which, so you will need to match up the required fields in Edsby’s gradebook with the appropriate columns. Most importantly, you need to identify and match the students from the file with the class roster. You can do this using either the Student ID, GUID (Edsby’s unique identifier), or the Student Name. Keep in mind that if you want to match by student name, you will need both the students’ first and last names present in two separate columns in the import file.
The drop-down menus will allow you to select which columns in the file are equal to which fields. If the field does not exist in the file, you can also create them as you import. Simply select: “This is for one assessment and I will specify it…” and this will allow you to enter a text value for this field. As you fill out the form, you will see the numbers at the bottom of the form indicating whether or not Edsby is recognizing the fields. If the message is saying that it will import 0 grades, there may be an error or a mismatch with the file you are using.
Once all the fields are selected, clicking the Import button will merge the file data with the gradebook. If the file imports successfully, you will see the new assessment and grades appear in Edsby’s gradebook, planner, and anywhere else you would normally see them. You can also make changes or delete the assessment using the usual tools.
If you have a gradebook on Edsby which has a large number of graded and weighted assessments, you may have noticed some peculiar behavior. Sometimes, when you give a student 100% for an assignment, this can actually cause their overall average to drop! Don’t panic, the gradebook and weighting form are working correctly.
Before a grade is entered for an assessment, its weighting value is not being calculated with the rest of the values in the gradebook. When the grade is entered, the new weighting is applied and all the values adjust accordingly. Grades which contributed more to the average earlier may contribute less once a new assessment is graded and cause their value and the overall average to drop. In these cases, you will notice that if you change the grade from 100% to 0%, the average still adjusts down accordingly. It is only when there is no grade at all and then a grade is entered that you may see the average drop.
This behaviour is confusing, but because grading is so complicated, it needs to work this way. You can always add more weight to the assessment so that its value actually contributes more to the average.
Here is a tutorial video which explains weighting in depth:
Since the buckets in the weighting form always add up to 100%, you may assume that an empty one would automatically subtract its value from a student’s overall average. In Edsby’s Gradebook, this is not the case. If there is an empty bucket, the grading will not include that percentage when calculating the average.
To explain further, if there is a weighting bucket with no assessments (or assessments without grades entered), these will never be applied to the final average. Even though the weighting form is setup to total to 100%, if one of the buckets is empty, the weighting numbers will then be applied against each other. For example, say you have four buckets in your weighting form: quiz, test, homework, and project, all weighted the same at 25% each. All the buckets have graded assessments except for the project bucket. In this case, the other buckets (quiz, test, and homework) will adjust and increase their value (relative to each other) to account for the missing 25% that would have been contributed by the project bucket. Effectively, the other three buckets will actually be contributing 33% to the average. Once a grade for a project has been entered, however, the weighting will reset – all buckets will contribute their shown average and the 25% value of the project bucket will be applied as well.
This is often useful when an assessment is of the Yes/No variety or other assessments where many students have the same result. Simply enter the grade for a single student, click and hold the bottom right hand corner of that gradebook cell, and drag down to copy this grade to multiple students.
Edsby normally allows teachers and other school/district staff to change their pictures. By default, this is done by clicking on the picture in your profile (click on your name in the top right of any Edsby screen, and select Profile). However, some districts have intentionally disabled this capability and don’t allow staff to change their photos from the default blank or other official school photo they may have uploaded on your behalf. If you’re unclear which applies to you, ask your Edsby administrator or technical prime at your school.
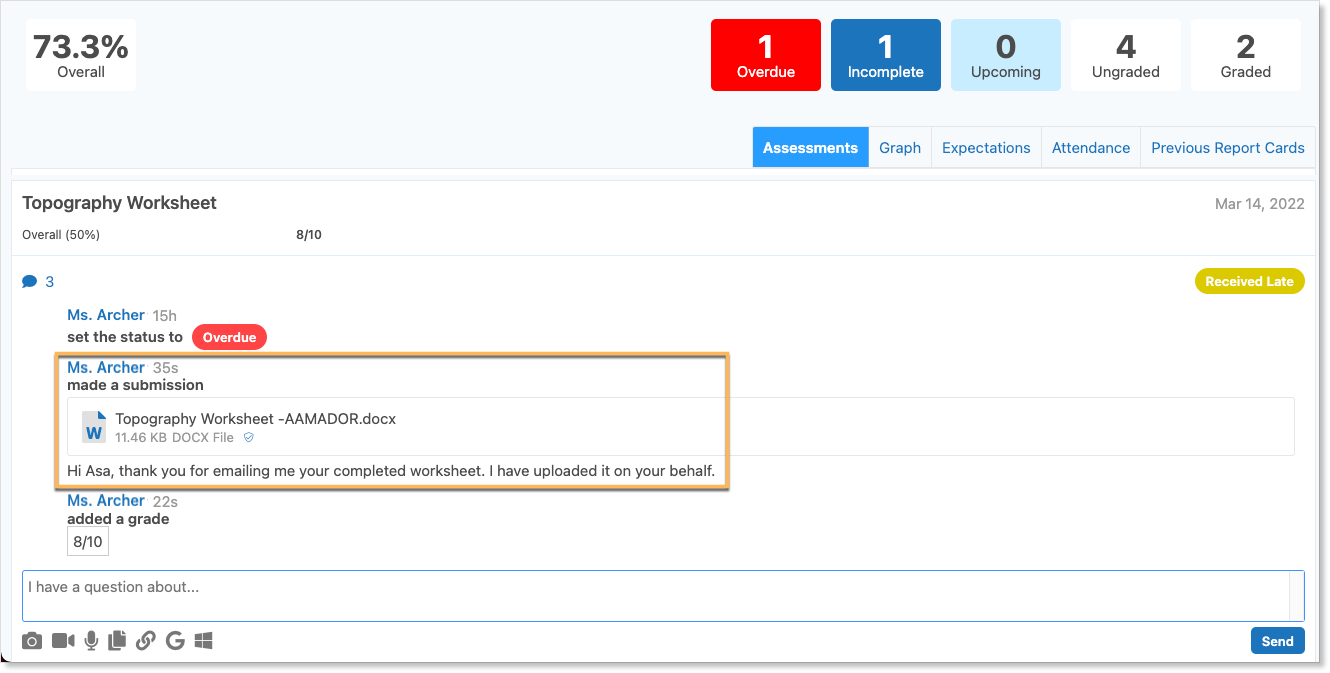
Using the Grade Gadget in the Gradebook, Edsby allows teachers to mark an assessment as Overdue even if the due date has not yet passed. This will be visible on both the student’s and their parent’s Edsby homepage. If e-submission is enabled for an assessment and the submission date has passed, the assessment will automatically be flagged as Overdue if no grade has been entered in the Gradebook by a teacher.
To remove or change the overdue flag, simply open the Grade Gadget and select a different flag. To display no flags at all, just select “No Status Flag”.
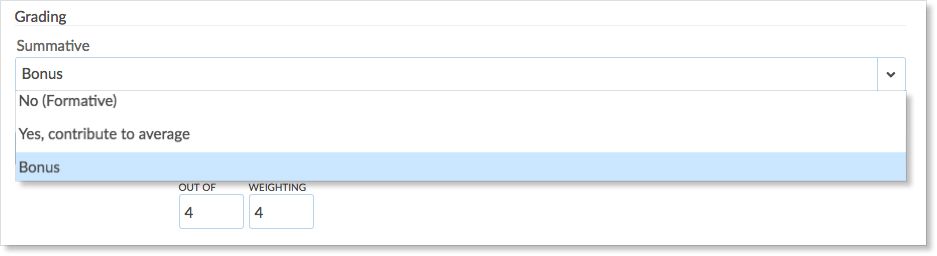
Edsby allows teachers to create assessments which either contribute to the student’s overall average, have no effect on the average, or are “bonus” and are only able to contribute to the average in a positive way. To create a bonus assessment, select the bonus option under “Grading” on the assessment form.
Like normal assessments, bonus assessments will need to have a grading scheme and a weighting. The only difference is that the bonus assessment will only ever add to a student’s average and never detract from it. Like normal assessments, you can edit the weighting of the bonus assessment either when creating it or afterwards in the Edit Weighting form in the teacher’s Gradebook.
Teachers also have the ability to give students bonuses for individual assessments. Currently, Edsby’s Gradebook allows teachers to enter a grade up to 120%. Any higher than this and the grade will be flagged with a yellow exclamation point. Edsby will assume that the grade is a mistake and not use it when calculating the student’s overall average.
To override this, simply click on the yellow exclamation point. This will bring up a dialogue box which will enable you to allow the grade as it is entered. Once you click “Allow”, the student’s average will adjust accordingly.
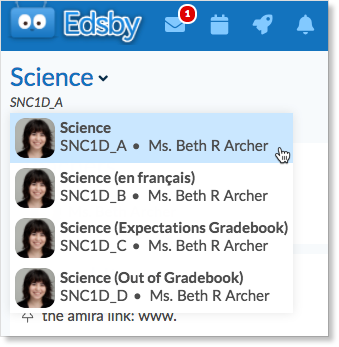
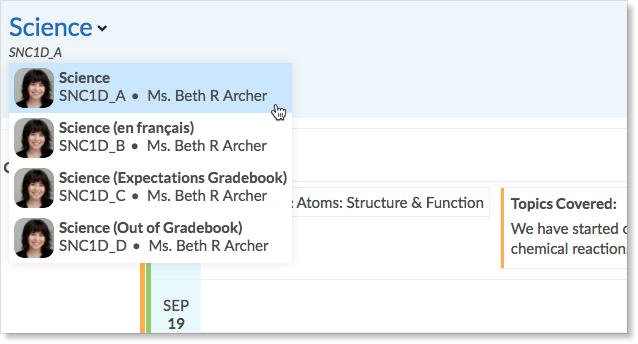
Clicking the blue dropdown arrow next to the name of the course enables you to jump to your other classes while staying on the current view.
For example, if you are in the gradebook, you can navigate to other gradebooks.
If you are in the planner, you can navigate to the Planner of different classes.
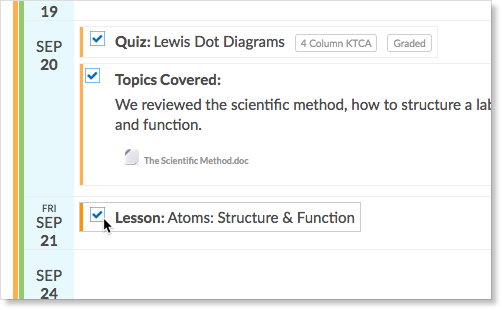
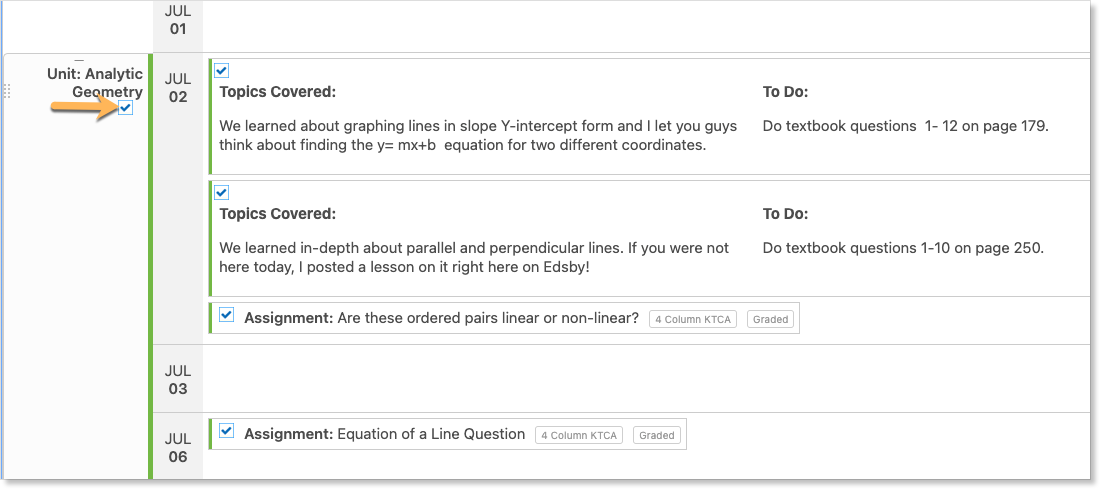
You can copy and cross-post assessments from your class Planner by doing the following:
Click on the Planner link across the top navigation bar in a class.
Click on the “Gear” icon in the top-right corner of the Planner.
Navigate to the assessments, lessons, or journals you wish to copy and place check marks in the box beside each.
To quickly select an entire unit, select the checkbox below the unit name. All content within the unit will be selected.
When you’ve selected all you wish to copy, click the Copy button. If you wish to paste this content to a differentclass, navigate to that class Planner.
Scroll to the date you wish to paste the content to and hover your mouse on it. You’ll see a Paste button appear on that date – click it.
If you copy and paste a single assessment, lesson, or journal, it will appear on the selected date. If copying multiple items of content, the first item copied will be pasted on the selected date and the remaining items will attempt to find logical dates that keep the same range as the original content.
For example, a teacher copies two assessments dated for Friday, January 10th and Thursday, January 16th, and pastes to Monday, January 20th. The second assessment is assigned to Friday, January 24th, which keeps the number of school days between assessments consistent. The Planner will always attempt to place assessments into dates when the class is scheduled to take place.
Within each class is a Setup menu only available to teachers. To access it, click the three line “hamburger” menu at the right of the Classes’ navigation panel and select Setup.
Within the Class Settings, teachers will find settings for student and parents that govern their level of access to the class. These settings only affect students enrolled in this class and the parents linked to those students. All other student and parent accounts will not have access to this class regardless of these settings.
Other teachers will not have access to a teacher’s classes by default. If a teacher wishes to allow another teacher access to one of their classes, list their name in the Teachers and Assistants section of the Class Settings.
This will put the class on the other teacher’s Edsby class list and give them the same control over this class as your own – including the ability to add, edit and delete gradebook content. Accounts with office head, vice principal, principal, and IT administrator roles will always be able to access teachers’ classes.
Edsby is a modern web application that uses modern web standards like HTML5 and JavaScript to deliver a powerful and elegant user experience using the web. For this to work properly you need to have a reasonably modern web browser that is designed to support these popular web standards. Browser upgrades are free, and each new version tends to be faster and better than its predecessor, so it is a good idea to keep your browser up to date.
Edsby is tested extensively on recent versions of:
Google Chrome
Apple Safari
Mozilla Firefox
Microsoft Edge
We know that it is not always possible to run the very latest version of a browser, so we try to make sure Edsby will work with older, less capable browsers. However, we do not guarantee Edsby will work on anything older than two major versions back.
Cookies Required
Like many modern web applications, Edsby stores a local “cookie” on your computer to help speed things up. You need to make sure you have cookies enabled in your browser for Edsby to work properly. Consult the help documentation for your browser if you need to find out how to check this browser setting.
JavaScript Required
The Edsby web user experience is built with JavaScript. You need to make sure you have JavaScript enabled in your browser. Consult the help documentation for your browser if you need to find out how to check this browser setting.


 New messages are created by clicking the compose icon in the inbox. Search for the name of the recipient(s) to message.
 Teachers can add any number of recipients when creating a conversation, however, this cannot be changed afterwards. Think of Edsby Messages as a chat room rather than a chain of emails.
To help teachers keep a specific conversation focused on its original intent, teachers can close a conversation by clicking the lock icon.
Teachers can add any number of recipients when creating a conversation, however, this cannot be changed afterwards. Think of Edsby Messages as a chat room rather than a chain of emails.
To help teachers keep a specific conversation focused on its original intent, teachers can close a conversation by clicking the lock icon.
 Senders of private messages in Edsby see in their mailboxes when recipients have opened and read their private messages. This means a teacher can see when individual parents, for example, read the private or group messages they send. It also means parents, in turn, can also see when teachers read their messages. This is intended to promote transparency in communications.
Teachers should avoid creating private messages to all students in a class. It’s more work. Teachers should just post a note in the relevant Edsby class instead. It’s quick and easy, and students will see it because they get notifications of new notes in their classes and have learned the Edsby class is where important information is posted.
Note most schools and districts intentionally disable Edsby messaging between students. When they do, students cannot send messages, or chats, to their friends in Edsby. usually because their school or district is concerned about what students might exchange. Most Edsby customers encourage student-to-student messages in other official systems if they allow it at all.
Some Edsby sites even disable Edsby messaging between parents and teachers. When they do, it is often to encourage parents to use other official channels for teacher communication or because they don’t want to add to teacher workload.
If messaging between parents and teachers is enabled, Edsby enables teachers to choose whether or not parents can send them unsolicited messages. Navigate to Settings and click Other Settings. Select the box to enable unsolicited messages and deselect the box to disable them. This can be changed at any time.
Senders of private messages in Edsby see in their mailboxes when recipients have opened and read their private messages. This means a teacher can see when individual parents, for example, read the private or group messages they send. It also means parents, in turn, can also see when teachers read their messages. This is intended to promote transparency in communications.
Teachers should avoid creating private messages to all students in a class. It’s more work. Teachers should just post a note in the relevant Edsby class instead. It’s quick and easy, and students will see it because they get notifications of new notes in their classes and have learned the Edsby class is where important information is posted.
Note most schools and districts intentionally disable Edsby messaging between students. When they do, students cannot send messages, or chats, to their friends in Edsby. usually because their school or district is concerned about what students might exchange. Most Edsby customers encourage student-to-student messages in other official systems if they allow it at all.
Some Edsby sites even disable Edsby messaging between parents and teachers. When they do, it is often to encourage parents to use other official channels for teacher communication or because they don’t want to add to teacher workload.
If messaging between parents and teachers is enabled, Edsby enables teachers to choose whether or not parents can send them unsolicited messages. Navigate to Settings and click Other Settings. Select the box to enable unsolicited messages and deselect the box to disable them. This can be changed at any time.